Hi, friends! Am I really back so soon with another post?? I know it’s hard to believe after months of neglecting the blog portion of this little crochet business of mine! Alas, here we are! 😉
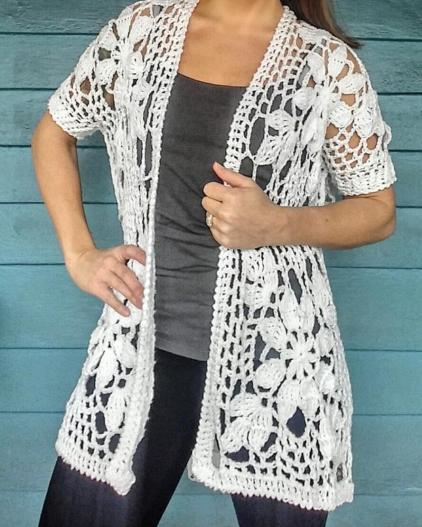
Back in March, I finished up a motif-based, light-weight jacket. The version that first caught my attention was made into a cocoon style sweater, but I wanted to make a longer and more traditional jacket.
The motif itself comes from this free pattern on YouTube–there is no written pattern, so please be patient with yourself if you decide to make this motif and aren’t accustomed to following along with a video. I promise, though, it is worth it! Just look how beautiful it is! And I’ve seen it in a few other colors–it’s always gorgeous!

Want to buy this jacket?? I’m selling them on my website!
I found it helpful to take notes on the pattern for my own use as I went through the video–the first motif took quite a while to complete, re-watching parts of the video, writing things down–but it was really nice to have an abbreviated written version available for the subsequent motifs.
After figuring out how many motifs to use and how to assemble them, I decided on border and sleeve designs. I’ll admit–it is a bit of a rough draft, and I don’t plan to have anyone “test” it, per se, but since it is a free tutorial based on a free pattern, consider this a great opportunity for you to get creative and gain some confidence in your crochet work and pattern decision-making skills! 🙂 Still, I think it turned out pretty great!
Time to make one for yourself!
NOTES:
Please know that I do not take responsibility for or ownership of the motif pattern itself–it is a free pattern from another maker, which has been linked both above and below. I’ve created this tutorial to show you how to use this motif to make the jacket/cover-up.
I’ll give the quick and simple cover-up conversion instructions at the end! Regardless of how you plan to use this piece, the yarn usage listed below has got you covered.
Admittedly, the material I used makes for a heavier-than-ideal (at least for me) bathing suit cover-up. But if you’ll be someplace with bars/restaurants right on the beach, it’s a perfect cover-up so that you won’t feel naked AND you won’t be freezing in their cranked up air conditioning! 😀
MATERIALS:
5.5mm hook
~660m worsted weight cotton (I used 4 skeins of “I Love This Cotton” in white.)
4 skeins of this material still left me with about 30m after converting to the cover up. If you need to make a wider sleeve, you should still have enough with 660m. If you also intend to make the cover up strap longer or wider than mine, you may want to purchase extra cotton to be safe.
Scissors
Darning needle
STITCHES USED:
Ch – chain
Sl st- slip stitch
Dc- double crochet
Tr – treble crochet
Tr4tog – treble 4 together
Tr5tog – treble 5 together
Crab st – crab stitch, or reverse single crochet
Dc2tog – double crochet 2 together
Fpdc – front post double crochet
Hdc – half double crochet
INSTRUCTIONS:
You will be making a total of 8 motifs and using the join-as-you-go method. Generally, this is not my favorite method, but in the case of this motif, it worked out splendidly and I really recommend you give it a try if you haven’t in the past. It was much easier and faster than other methods I may have used, ordinarily.
Start your first motif with this video: Motif Pattern on YouTube
I used the magic ring to start, which is not what is shown in the video. Either method will be fine and simply depends on your preference.
Make your first motif. WOOHOO–one down, 7 to go! 😀
Before starting your second motif, please watch the first minute or so of Part 2 of the pattern videos so you have an idea of what’s coming for the joining method: Part 2 of Motif Pattern
ASSEMBLY:
Using the join as you go method demonstrated in Part 2 of the video (linked above), you will join your squares in the following (or similar) fashion:

Joining squares 1-6 is the easy part–just make sure you DON’T close up the space between 5 and 6 because that is the front/open part of the jacket.
When you get to square 7, you will join to square 5 as you’ve done all the others. You will ALSO join to the side of square 3 to close up the side seam at the same time! I’ve highlighted these joins in another schematic below. You will follow the same instructions for square 8, joining to both 6 AND 4.
Just join the sides of the squares that are matching in color. Picture the schematic folding down on itself at the shoulder join line.
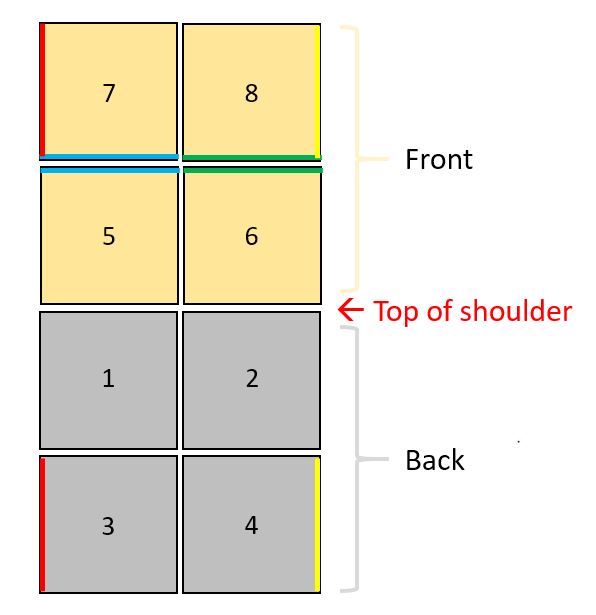
Excellent! The body of your jacket is now complete–time for a border!
BORDER:
Starting at the bottom inside corner of square 8 on the open edge:
R1: Dc evenly around the entire open edge of the jacket, making a sort of U shape. Ch 1, do NOT turn.
R2: Crab st (reverse sc) back around. Finish off.
Starting on one of your side seams where the opening begins for the armhole, with the right side out:
Loosely sc towards the shoulder to close off the armhole a little bit more–go up to the center of the square. (This is optional–if you want a really loose and open arm hole, skip this step.)
Starting right where you are at the bottom of your armhole:
R1: Ch 2 (first dc), dc evenly around the entire armhole. Join to ch 2. (If you want to cinch up the sleeve even more, only dc into the dc stitches and make just 2 dc stitches in the larger ch spaces at the shoulder join.)
R2: Ch 2 (first dc), dc in next 3 st, dc2tog (decrease). *Dc in next 4 st, dc2tog* around. Join to ch 2. Don’t worry if your st count doesn’t come out for a perfectly even repeat.
R3: Ch 2, *fpdc around next st, hdc in top of next st* around. Join to ch 2.
R4-R5: Repeat R3.
R6: Crab st (reverse sc) around. Finish off. Weave in all ends.
COVER UP CONVERSION:
R1: Ch 4. Hdc in 2nd ch from hook. Hdc in next two chains. Ch 1, turn. (3 hdc)
R2: 3 hdc across. ch 1, turn.
R3-Rxx: Repeat R2 for as many rows as needed to reach desired length. I made mine ~equal to my wingspan. Finish off and weave in ends.
Feel free to make your belt wider than 3 stitches, of course. I just preferred the daintier look of it being rather thin.
CONGRATS! Time to go ROCK this new jacket/cover up of yours!


Can you tell me how big each motif square is? Thanks!
LikeLike
Connie- Sorry I’m only seeing this comment now. The motif size will depend on the material, hook size, and your tension. Mine turned out to be an average of ~11in. x 11in.
LikeLike
Hi! Can this pattern need extra squares to make extra large?
LikeLike
Yes, of course you can add additional squares to make it larger. Increasing length is simple, as you can just join those additional motifs at the bottom.
I try to keep front and back panels equal (current pattern has 2 motifs on back, then one for each front panel for 2 in front total). For additional bust/waist/hip and keeping whole numbers, you would need 4 across the back and 2 each for right and left panels on the front. Depending on your material, that could be just right or too large. I might recommend trying 3 motifs across the back, and then half motifs to add to the front panels (ie, crocheting only the first half of the motif starting from center, then turning to continue). This can give you 3 across the front with 1.5 motifs on each side, respectively. 😊
LikeLike
I’ve just finished this project… thanks for posting the pattern, my daughter loved it and just in time for our water park outing this weekend.
LikeLike
So glad to hear your daughter is loving her cover up!! 🙂
LikeLike
What size does the pattern fit?
LikeLike
It’s not sized, per se, but would fit most small-to-large sizes and up to perhaps 5’8″ in height for length.
LikeLike
Gorgeous! Thank you!
LikeLike
You’re welcome!! Glad you found my page! 🙂
LikeLike
Hello really luv the lacy petals jacket, the link doesn’t work! Plz plz 4ward the link or pattern so I can make n wear 2 a wedding in on June 9th. Thank u in advance
LikeLike
Marquetta, I’m sorry that I could only respond now. I have been traveling. I do not see any issues with the YouTube links, though. Still, here are the URL’s for you to copy and paste:
Part 1: https://www.youtube.com/watch?v=m-zZ5V3Sv_g&feature=youtu.be
Part 2: https://www.youtube.com/watch?v=OKFRTsBkyyI
LikeLike
Blogging a pattern for a cover up should include the written pattern for the motif you’re using as the basis of the pattern. I would not have visited your blog if I had known I would just have to transcribe the pattern for myself via She & Ru’s YouTube video. I spent over 2 hours crocheting my own first motif because I had to write the pattern out myself. Did you not do the same when you created your cover up? The “blogging” part would have come in when you shared the pattern with the people who visit your site. I have used She & Ru before, and from now on will continue to visit her YouTube channel directly.
LikeLike
Kate,
Unfortunately, it would be a breach of copyright for me to share a pattern that is not my own even though it is free on YouTube, hence why I mention in my notes, explicitly, that I do not claim ownership for the design of the motif pattern itself and link readers to She & Ru’s video. The “blog” is a tutorial in which I provide instruction for creating the cover-up by using the motif design. Of course, the first motif I made took longer and I made notes for subsequent motifs, which I also indicated would be the case for the visitors of my site in the first couple of paragraphs of the blog. Again, without express permission from She & Ru to provide the written pattern, I am unable to do so as I do not own the pattern in the first place. It just makes more sense for me to provide the remaining instructions and push the site hits to She & Ru.
Best,
Erin
LikeLike
Did you steam or wet block this? My squares are the same size but my overall length seems smaller so I’m wondering if that’s it. Plus yours looks so nice! Thanks!
LikeLike
I quickly steam blocked it and gently tugged on it to even things up and add a smidge of length! 🙂 It makes a big difference, especially across the joining areas.
LikeLike
I’m making this currently. I had to make an extra motif for each strip to make it as log as you show in the photo. I used 640m and ended up with 10.5 motif squares. I need to purchase additional yarn online, do you have an estimate of how much yarn it took to complete the edging and belt?
LikeLike
Hi, Stephanie! I do not have any separate measure or notation of how much material I used specifically for the edging and belt- sorry! If you are using the same yarn that I did, I would say 1 more skein would be enough, but I always err on the side of caution so it wouldn’t hurt to order 2! 🙂
LikeLike
What size are you making? I need an XL and want to be sure I order enough yarn.
LikeLike
It isn’t really sized based on standard sizing practices. If you have made a motif, please measure it and compare that to the final dimensions you would like your jacket to be. My motifs were 11in x 11in BEFORE blocking, so approximate dimensions are 22in long x 44in around before steam blocking the final piece. If your motifs come out much smaller than mine, you will, of course need to make more of them; or you may try increasing your hook size to get a larger motif- wouldn’t be a bad option since it is a lacy piece, anyway, and my gauge is typically larger than most crocheters’.
LikeLike
Thanks. I’ll play around with it. I haven’t crocheted in the past year and I thought this would be a good project to start. Have you written a pattern down that you could email me? I haven’t worked from a video in ages.
LikeLike
Hooray- welcome back to the hobby! 🙂 As for the pattern, it is not mine to give away in any format since it was created by the makers of the video, and it would actually be an infringement of copyright for me to do so. The first one will take you longer to get through- take all the detailed notes you need from the video to write out the pattern as you watch/create, and then the following motifs will be a breeze!
LikeLike
The sheru website includes a crochet chart for the motif, for free, if you subscribe.
LikeLike
Goodness my motifs are 11X11 but using only 8 motifs won’t even cover my behind. Lol. I’m usually a size small/medium and 5’7. Guessing I’m going to need to add 2 more motifs on the front and 2 more on the back to get the length shown.
LikeLiked by 1 person
I love the cover up/jacket pattern. I need a little help with the border though. I have joined everything as instructed and am ready to begin the border. I understand DC evenly around but did you DC, CH2 or anything or just DC? Did you do one DC in every stitch, or every other stitch,or what? I guess I just need a little more direction. Thank you in advance for any help you can give me!
LikeLike
Amanda- sorry I missed your comment months ago! I *did* do just straight dc stitches, though, and approximately one dc for every stitch I was going over. I’m sure I skipped some here and there where there were joins since I didn’t want it to get jumbled or bulky. Hopefully by now, you’re all finished and ready to enjoy your cover up this season (assuming you’re in northern hemisphere lol)
LikeLike
I just finished up this beautiful cover up! I added extra motifs for the length as I thought it may not be long enough. It actually was long enough, but it really looks good. Thank you for sharing this idea and the motif. It was fun!
LikeLike
Thank you for sharing. It’s awesome and I love it!!!! 👍😘❤️🌹
LikeLike
Oouphs!!! I think you met to write to join 4 and 8. And not 4 and 6. Thanks. Rose
LikeLike
It was the same for me! The original length was just past my crotch, a bit too short for a swimsuit cover up imo! Though maybe good for a normal cardigan – the additional motifs has it just past my knees which I fear is too long, but I couldn’t figure out how the half the motif! At least it’ll have a Boho look 😀
LikeLike
Where can I get a written pattern for the motifs. Trying to follow the video is not that easy. Please advise.
Thank you for your time and have a good weekend.
LikeLike
Joan, the designer of the motif has only provided the video version. As it is not my design, I’m not able to publish any written version. It helped me tremendously to watch it slowly as I made the first motif, all the while writing down each step/round. Then I had my own notes for a written version for future motifs rather than watching the video over and over. Happy Sunday!
LikeLike
Is there a tutorial on this pattern? If so could please advise where I can find it.
LikeLike
Sharon, this post includes the tutorial. There is only a youtube video for the motif design, which I have linked and cannot include any written instructions as it is not my design. Further down, you will find the instructions for sewing together the motifs to create the jacket/cover-up! Apologies for my delayed response- hope that helps!
LikeLike